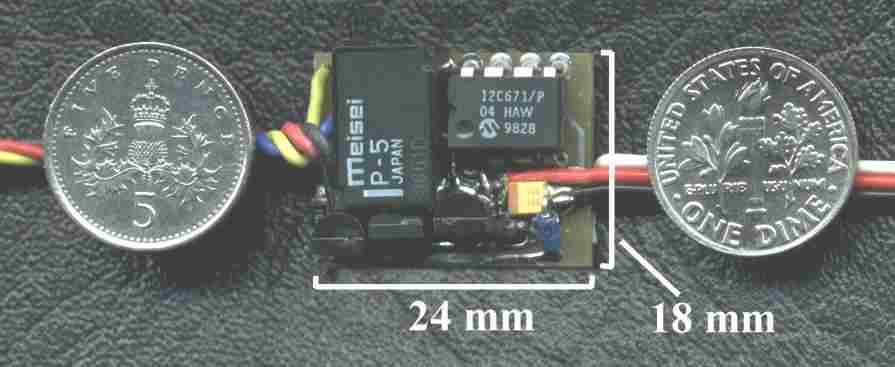
The LC302 is a high quality microprocessor controlled speed control unit which is designed to fit inside the locomotive and operate in a number of different modes. In its standard form, the LC302 will take its power from a locomotive mounted battery and its control signal from a radio receiver, but it is possible to pick up power from the track, or to switch to conventional speed control from the track voltage. The LC302 will work over a number of different voltages and currents, and provides a regulated supply for a radio receiver.
Note that the LC302 includes a battery eliminator circuit, which provides supply voltage to a radio receiver connected to the radio connector. This circuit will provide the input voltage less 0.3 volts up to a maximum of 5 volts. Note that most receivers require at least 4 volts to operate, giving a minimum requirement for 4 ni-cad batteries.
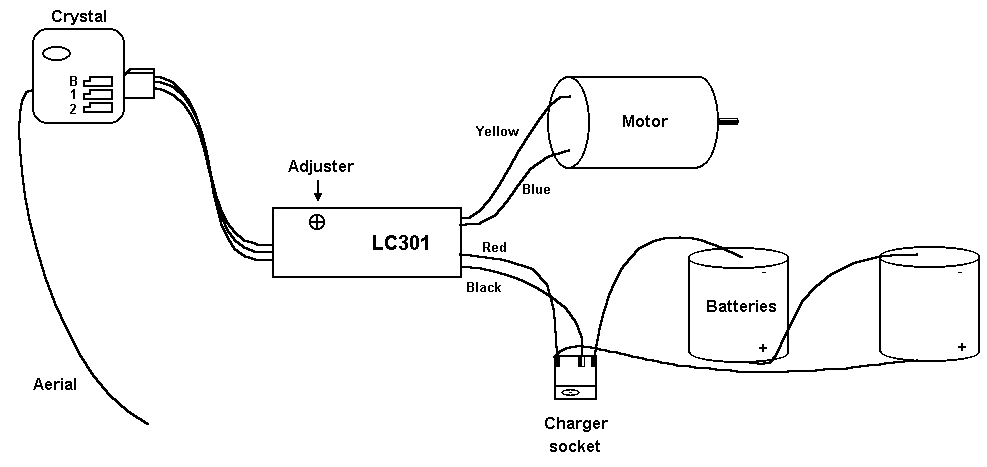
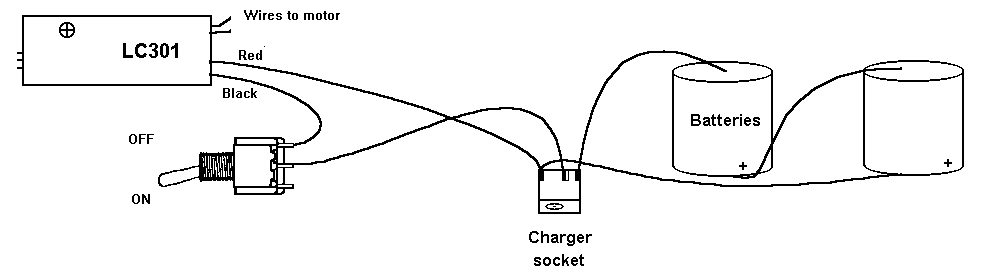
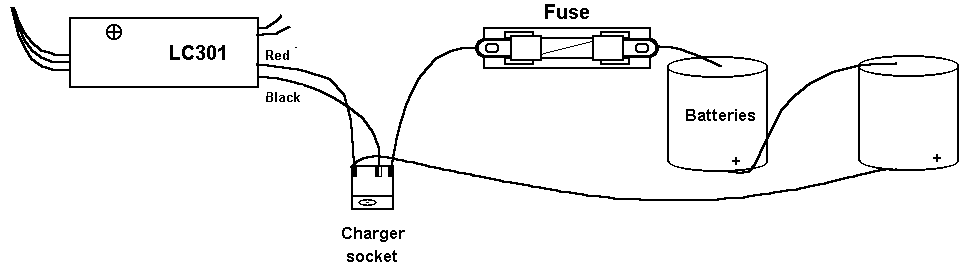
The red wire from the LC302 is the positive supply, and should be connected
(via the charging socket) to the positive (+) end of the battery. If the
battery is fitted with a raised button contact it will be at this end.
The black wire from the LC302 is the negative return, which is connected
via the charging socket to the negative (-) end of the battery.
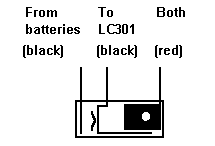
The charging socket is fitted in the black (negative) lead between the
batteries and the LC302. The charging socket is also connected to the red
(positive) lead to provide a path for the charging current. Antenna supplies
a charging socket, which is connected as shown. The Antenna socket is internally
switched so that the LC302 is disconnected from the battery when the charger
is connected to the batteries. If another charging socket is used, it must
also be internally switched, as it is vital the charger is not connected
to the LC302. Chargers can produce much higher voltages than the batteries
they are designed to charge, and these high voltages will damage the LC302.
The internal switching on the Antenna socket will only work if it is connected
as shown below, so damage may result if this wiring is not followed (looking
from the back of the socket).
A useful addition if space is available is a switch to switch off the LC302, radio receiver and motor when not in use. This will prevent the battery being discharged. If you can't squeeze a switch into your locomotive, inserting a blank plug (i.e., a plug with nothing attached to it) into the charging socket will have the same effect. The switch, which can be a single pole on-off or changeover switch, can be in either the red (positive) or black (negative) wires between the charger socket and the LC302. The batteries can be recharged whenever the charger is connected whether or not the switch is on. As mentioned above, if a charging system other than the Antenna charging plug and socket is used, a switch must be provided between the power source and the LC302 and this switch must always be switched off when charging is being carried out, otherwise the LC302 (and receiver and motor) may be damaged.
The batteries should be connected positive to negative, i.e., the positive end of one battery should be connected to the negative end of the next. The red lead from the LC302 should be connected to the positive end of the first battery through the charging socket (as perhaps switch) and the black lead to the negative end of the last battery, with the other positives and negatives connected to form a daisy chain arrangement.
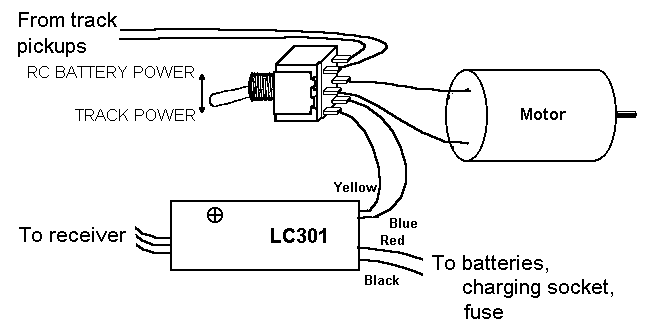
It does not matter which way round the blue and yellow wires are connected to the motor. Reversing the wires will cause the motor to turn in the opposite direction for a given movement in the transmitter switch. However, most transmitters, including those sold by Antenna, have servo reverse switches which also change the direction of travel for a given direction of movement of the stick.
The LC302 can be plugged into any of the radio channels on the receiver, allowing it to be controlled by any of the sticks on the transmitter. On a two channel transmitter, the right hand stick (normally channel 1) usually has a left to right movement, and the right hand stick a front to back movement. You can use either of these channels depending on your particular preferences. The speed of the motor controlled by the LC302 will depend on the amount the stick is moved from the centre position.
Each stick has a smaller adjusting control. This is used for fine adjustment of the centre position so that when the stick is released the motor will be switched off, but it can also be used for slow speed control.
Always discharge the batteries before fitting them to a model, either by connecting them up to the LC302 system and running the motor until it stops, or by connecting a resistor across them. Never short ni-cad batteries - they contain a large amount of charge and could start a fire or explode if they are shorted. This is why it is essential to discharge them fully before fitting them into the model, especially if it is a brass one. If you accidentally short out a fully charged ni-cad when fitting it to a model you could inure yourself, and/or convert part of your model to a piece of charred metal.
Charging
Unless your batteries are removable, you will need a suitable lead to go from your charger to the model. Always ensure you have the correct charger for your batteries. Chargers for lead-acid batteries will not charger ni-cad batteries, and vice versa (in fact, damage will be caused in each case).
The Antenna charger is a slow charger for ni-cads, and takes 12 to 14 hours to charge the batteries. This type of charger will work for any number of batteries up to 15, as long as it is supplied with a voltage at least 2 volts higher than the voltage of the battery (up to a maximum of 20 volts). The charger uses different leads for different battery capacities, since the charging current depends on the capacity and the charger is effectively told the charging current by the lead used. Leads are available for charging all the different batteries we supply, so you only need one charger for all your models, even if they have different batteries. However, you will only be able to charge one of them at a time. Futaba Attack transmitters contain a charging socket and a lead is available to allow these to be charged as well.
The charger should be used with the metal heat sink uppermost. A wire ended lead is supplied which fits the input socket. This lead should be connected to a low voltage supply of less than 20 volts (ac or dc), which is at least 2 volts more than the battery voltage, and can supply a current greater than one tenth of the capacity of the battery. For example, to recharge a bank of 5 1100mAh ni-cads, a supply of between 8 and 20 volts, ac or dc, with a current capability of at least 110mA, is required.
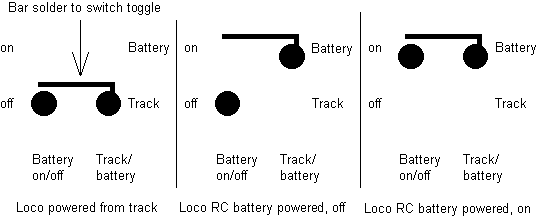
When running from the track, the radio system should be switched off to conserve battery power. This could be done by combining the track/battery and battery on/off switches into one three pole switch, although then the only way to switch the radio system off is to switch the track power one, and it is not possible to isolate the locomotive. An alternative is to interlock the switches by soldering a tab on to the track/battery switch so that when it is switched to track, it moves the on/off switch to off if it is not already set that way. When the track/battery switch is at battery, the on/off switch is free to move to both positions.